TEXT SCRAMBLING in TRIAL VERSION OUTPUT! In evaluation mode, Help+Manual will scramble individual characters in random words in your published output files. This is a limitation of the free trial version. This help system was created with an evaluation copy of Help+Manual.
Entering and editing text in your topics in Help+Manual is very similar to working in a word processor. To edit a topic select the topic in the Table of Contents or Project Files section of the Project Explorer, then click inside the editing window to start editing.
The Write tab in the Ribbon provides direct access to all the tools you need while you are editing. The only group inside this section that may be unfamiliar to word processor users is the Insert group, which contains special tools and objects used in help authoring projects.
Editing overview
|
·You can type and enter text and copy and paste from other programs just as you would in a normal word processor. ·Double-click to select a word, triple-click to select an entire paragraph. ·Use the tools in the Font and Paragraph groups in the Write tab to format text. Select text to apply new formatting, select a formatting option (Bold, Italic etc.) and type to change formatting from the current cursor position. ·The Font and Paragraph groups have additional dialog modes that you can display by clicking on the little icons in their bottom right corners.
·Hover the mouse pointer over the tools in the Write tab of the Ribbon for descriptions. ·You can save a lot of time and work by using styles. See the Using styles tutorial. |
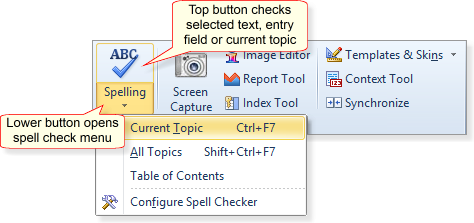
Spell checking
Live spell checking: #1.Select Project > Spelling > Configure Spell Checker and select the dictionary for the language you want to use in the Main Dictionaries section at the bottom of the dialog. Select Download dictionaries to get additional dictionaries. 2.Activate the Check spelling as you type option. Misspelled words will then be underlined in red as you type. Manual spell checking: #
·Select the top half of the Spelling tool in the Project tab to check the current topic or text entry field or window. If text is selected only the selected text will be checked. ·Select the bottom half of the tool for the spell-check menu. Spell checking is supported almost everywhere in Help+Manual where you can enter text. Just right-click to display the context menu or click on the upper half of the Spelling tool in the Project tab to access. |
Copying and pasting
|
·You can copy and paste text just as you would in a normal word processor. This works within topics, between topics and between projects. ·You can open multiple projects and copy and paste between them, or you can open Help+Manual a second time and copy and paste between the two windows. ·You can copy and paste formatted text from and to other programs, including Office programs like MS Word and MS Excel. Copying images from Word: #When you copy text with images from MS Word a dialog will be displayed prompting you to convert the embedded image data to an external graphics file. Always do this, or right-click on the image afterward and convert the image into an external file. Otherwise the image will be embedded in your topic file and will take up too much space. If you have many embedded images you may experience slow editing performance in the single-file HMXZ format. Even if you don’t, embedded images unnecessarily bloat your topic files and should be avoided if possible. |
Editor zoom and preview mode for screen/print styles and font sizes
|
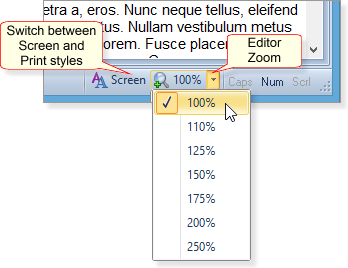
You can zoom the entire contents of the editor quickly with the Zoom control in the status bar below the editor window. This control is also available in the View tab in the ribbon toolbar. You can also switch the editor display between the styles defined for electronic help formats (HTML Help, WebHelp, Visual Studio Help and EWriter eBooks) print-style help formats (PDF, printed manuals, Word DOCX and ePUB and Kindle Mobi eBooks). This will only have an effect if you have defined different settings for screen and print output in your style definitions. Display buttons in the status bar: #
|